
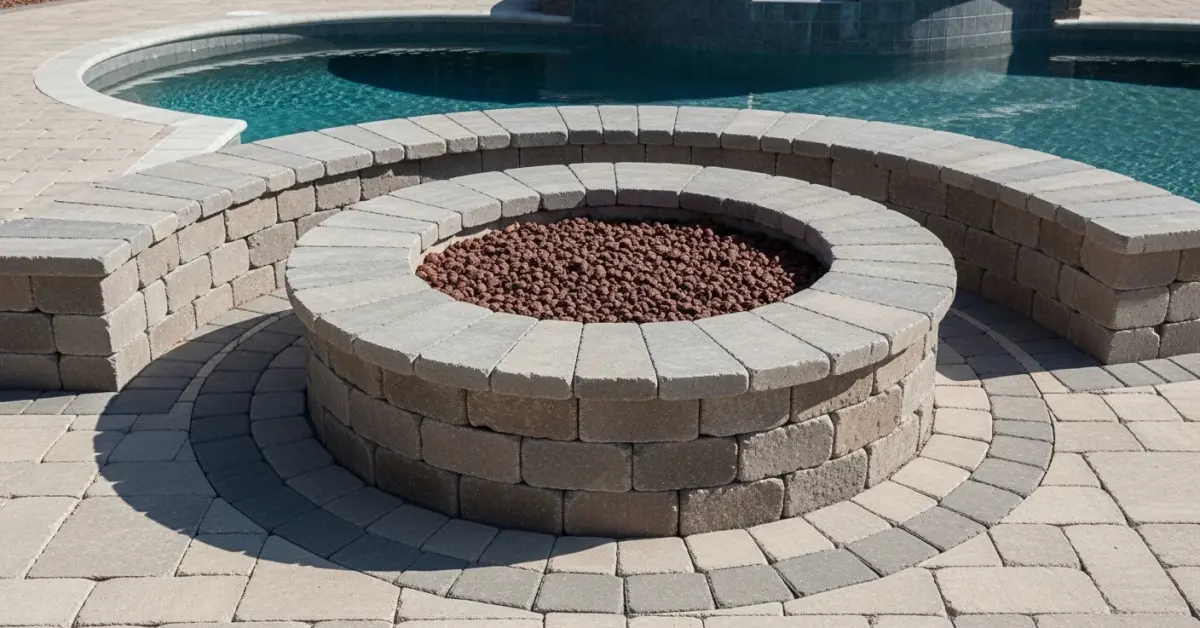
Curved Pavers For Fire Pit: A Base Protocol for Zero-Shift Stability in Pinellas County Soil
After years of correcting failed hardscape projects across Pinellas County, I've seen one issue derail more fire pit installations than any other: base failure. A homeowner in a beautiful Old Northeast bungalow invests in a stunning circular fire pit, only to watch it sink and shift unevenly after a single summer of our notorious torrential downpours. The problem isn't the pavers; it's the complete misunderstanding of how to prepare a stable foundation on our predominantly sandy soil. The common approach of simply compacting sand is a recipe for disaster here. My methodology, which I developed after a particularly challenging waterfront project in Tierra Verde, focuses on creating a multi-layered, permeable base that locks pavers in place while efficiently managing water. This isn't just about digging a hole and filling it; it's about engineering a sub-structure that guarantees a 20+ year lifespan with zero vertical shift, even with our high water table.The Sandy Soil Collapse: Why Most Fire Pits Fail in Pinellas
The core diagnostic failure I consistently identify is treating Pinellas County's sandy soil as a stable subgrade. It’s not. It's highly mobile when saturated. A fire pit built on a shallow, poorly compacted base will inevitably "float" and settle unevenly. My entire approach, the Pinellas Permeable Base Protocol, is designed to counteract this specific environmental challenge. It moves beyond simple compaction and creates a load-bearing, water-dispersing foundation that remains rigid. The mistake often begins with using the wrong aggregate or an insufficient depth. I’ve seen installations in Palm Harbor where the contractor used less than 4 inches of paver base, which is simply not enough to distribute the load of the fire pit walls. The weight concentrates, the sand beneath shifts during the next heavy rain, and the structure begins to fail.Aggregate Layering and Compaction Ratios for Coastal Durability
The secret to longevity, especially with the salt air from Clearwater Beach to St. Pete Beach degrading materials, is a precise layering system. Each layer has a distinct function, and its compaction is non-negotiable. Here is my technical breakdown for a standard 36-inch interior diameter fire pit:- Subgrade Preparation: The native sandy soil must be excavated to a depth of at least 10 inches and compacted to 95% Standard Proctor Density. This is the critical first step to prevent underlying sinkage.
- Geotextile Fabric Liner: A non-woven geotextile fabric is laid down. This separates the sandy subgrade from the aggregate, preventing the stone from being pushed down into the sand over time, which maintains the base’s structural integrity.
- Primary Aggregate Layer: I use a 6-inch layer of ASTM No. 57 stone. This clean, crushed stone provides the main structural support and creates large voids for rapid water drainage, essential during our summer storms. This layer is compacted in two 3-inch lifts.
- Bedding Course: A 1-inch screeded layer of washed concrete sand (or ASTM C33 sand) is applied. This is the fine-tuning layer where the pavers are actually set. Using the wrong type of sand here can lead to pavers shifting laterally.
Executing the Perfect Circle: A Step-by-Step Breakdown
Building a perfectly round and level fire pit requires precision from the very first paver. A slight error in the first course will be magnified by the time you reach the top. This is the implementation phase where my field experience makes a tangible difference.- Establish the Center Point: Drive a steel rebar stake into the exact center of your compacted base.
- Scribe the Circle: Use a string line tied to the center stake and a can of marking paint to draw a perfect circle for your first course of pavers. This string-and-stake compass is the only way to ensure a truly round structure.
- Set the First Paver: This is the most important paver in the entire build. Set the first paver perfectly level using a small torpedo level. Every other paver in this course will be referenced from this one.
- Lay the First Course: Place each subsequent paver, tapping it into the bedding sand with a rubber mallet until it is perfectly flush and level with its neighbor. Use a long level (4-foot) across the circle frequently to check for consistency.
- Apply Adhesive and Stack Courses: Once the first course is perfect, apply a bead of high-temperature concrete adhesive to secure the subsequent layers. Stagger the joints between courses for maximum wall strength.
First-Course Leveling and Joint Stabilization Tactics
The final stage of ensuring durability involves locking the entire structure together. After the adhesive has cured, the paver joints must be stabilized. My quality standard is a joint that allows for no lateral movement and actively resists weed growth. To achieve this, I exclusively use high-quality polymeric sand. The application is critical. After sweeping the sand into the joints, I use a leaf blower on a low setting to remove excess dust from the paver surfaces. Then, I use a specific "shower" setting on a hose nozzle to gently activate the polymers without washing the sand out of the joints. This prevents the hazy residue I often see on DIY projects and ensures a rock-solid bond. A correctly installed first course, combined with stabilized joints, creates a monolithic structure that can withstand the unique pressures of our local environment. Given the intense thermal expansion a fire pit endures during a hot St. Pete summer day followed by a cool evening fire, how do you calculate the optimal joint spacing for your specific paver choice to prevent stress fractures while maintaining a tight polymeric sand lock?Written by

Tags
pavers around fire pit
pavers around a firepit
paver patio designs with fire pit
building a fire pit with pavers
making a fire pit with pavers
Curved Pavers For Fire Pit in Pinellas FL FAQ
Do I need special fire-rated pavers for the fire pit ring itself?
Yes, you must use fire-rated materials like fire brick or a steel insert for the inner ring that directly contains the fire. Standard concrete pavers are not designed to withstand the intense, direct heat and can crack, spall, or even explode when moisture inside them turns to steam. The curved decorative pavers you choose are for the exterior surround and capstone, not for the combustion chamber. Using regular pavers for the interior is a common, dangerous mistake that leads to rapid structural failure.
What type of paver creates the smoothest curve for a round fire pit?
For the tightest and smoothest curve, you should use trapezoid-shaped or tapered pavers specifically manufactured for circular patterns. These pavers are narrower on one end, allowing them to fit together snugly without leaving large, V-shaped gaps that you would get by trying to force rectangular pavers into a circle. For a 1.2-meter (4-foot) diameter pit, a tapered block is essential for a professional look and structural integrity, as large mortar joints will inevitably crack and fail over time.
How do I calculate how many curved pavers I need for my fire pit circle?
First, determine the diameter of your fire pit and find the circumference by multiplying the diameter by pi (3.14). Next, divide the total circumference by the width of the wider face of a single paver block. For example, a 1.5-meter diameter pit has a 4.71-meter circumference; if your paver's wide face is 0.2 meters, you'd need approximately 24 pavers per course. Always buy a 10% overage to account for cuts, chips, and mistakes, as finding a perfect lot match for color later can be impossible.
Can I just set the curved pavers on the ground to build my fire pit?
No, you must build the fire pit on a compacted gravel foundation to prevent shifting, sinking, and frost heave. Dig down at least 15 cm (6 inches), fill with crushed stone or paver base, and compact it firmly with a hand tamper until it is perfectly level. Placing pavers directly on soil, even if it seems flat, guarantees the structure will become unstable and unlevel within a single season, causing the adhesive bonds between courses to break and the entire pit to lean or collapse.
What holds the layers of curved pavers together securely?
The courses of curved paver blocks are held together with a high-temperature, construction-grade landscape adhesive applied in a thick bead. Mortar is not recommended for DIY fire pit construction as it can crack with the expansion and contraction from temperature changes unless installed by a professional mason with proper control joints. The landscape block adhesive remains slightly flexible, accommodating minor movements and vibrations while providing a powerful, long-lasting bond strong enough to secure heavy capstones.
How far away from my house should I build a paver fire pit?
Your paver fire pit must be located a minimum of 3 to 7.5 meters (10 to 25 feet) away from your house, deck, or any other combustible structure. This distance is often dictated by local fire codes, so you must check with your municipality before you begin construction. A critical factor people often forget is overhanging tree branches; ensure there is a clear vertical space of at least 6 meters (20 feet) above the pit. An errant ember can easily ignite dry leaves or shingles, making improper placement a significant fire hazard.


